Cinema Production Lighting
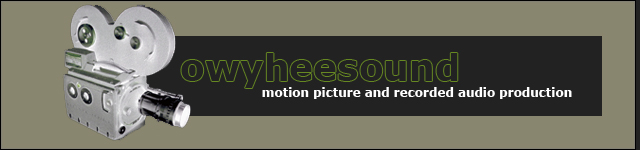
The Medium The very first thing to consider when lighting a scene for motion  picture production is the medium, or more specifically the medium's latitude. The medium is the image capturing device or stuff. For most motion picture this will be silver halide film. However, CCD video chips are becoming very popular for micro-cinema. Latitude also called "dynamic range" refers to a mediums ability to capture extremes of light and dark images. For example: if a CCD has a 'narrow latitude' the ccd will not be able to capture detail in dark shadows and bright highlights simultaneously.� It will most likely render middle tones well but will see the detail in dark shadows as black and render bright highlights as white.� On the other hand if a CCD has wide latitude it will see the details in the shadows and highlights simultaneously. Generally speaking film still has a wider latitude than video so it renders a more natural looking image with far less work on the part of a lighting crew.And modern film stocks, developed in just the last few years are even better at rendering detail in highlights and shadows than ever before so video systems have even further to go to catch up with film because film is still being improved. �The following four photos represent the way different mediums will capture the very same image lit the very same way. These photos are only an approximation of what they represent but they do convey the general idea.
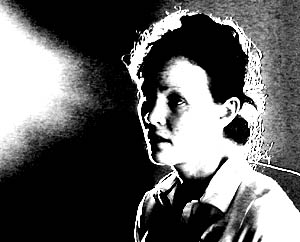
This photo represents what the human eye sees when looking at this subject. |
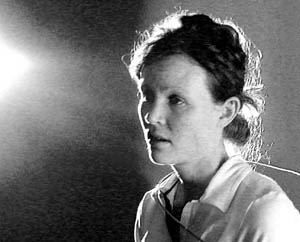 |
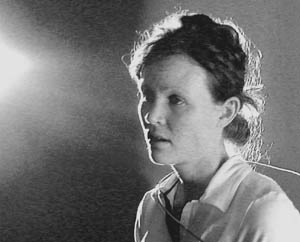
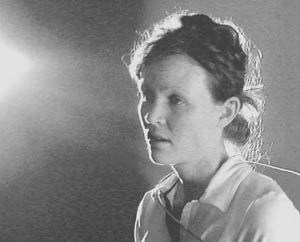
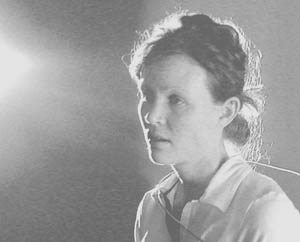
The following photos show differences in mediums. It should be assumed that the lights have not changed for each of the examples.
These photos have been altered from a single original photo are are meant to show the relative difference between mediums and lighting schemes. |
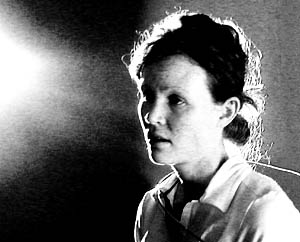
This is how a film camera, when the film is properly exposed and developed, will reproduce the image.
Notice that film has a wider dynamic range than the either of the video cameras below. |
 |
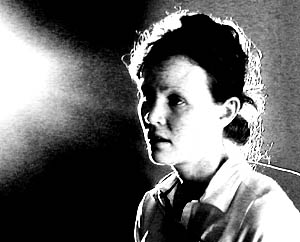
This is how a good video camera may reproduce the same image. Not as good as film, certainly not as good as the naked eye, but better than a consumer video camera.
|
 |
This is how an inexpensive video camera with very narrow dynamic range or 'latitude' will reproduce the image.
|
 |
The human eye can see a wider dynamic range than any normal motion picture medium. As such it sees a greater range of detail in the shadows and highlights of a lit scene. A poor quality imaging device with a narrow dynamic range will crush the details in highlights and shadows to white and black respectively. Film can come the closest to capturing the details that the human eye can see, but only when properly exposed and developed. Even then some detail is lost. However, film, professional video, even the least expensive video cameras can be used to create images that 'look' like what the human eye sees. The key to this is understanding how wide the latitude of the medium you are using is and lighting accordingly. If you are using a medium that can capture a wide dynamic range of light then lighting can be set fairly dynamically with fairly dark shadows and and very bright highlights. But if you are using a medium that can only capture a very narrow dynamic range of light then the shadows of you scene need to be relatively bright and the highlights need to be subdued. The result of bright shadows and subdued highlights when using a narrow latitude medium is a normal exposure that 'looks' like what the human eye sees. The problem with setting lights for a narrow latitude medium is that is can be very difficult to control light to the fractions of a stop needed to create the subdued highlights and bright shadows. This is why it is commonly said that it is harder to light for video than film.The following photos represent the same scene but lit with varying degrees of dynamic range of light. The expectation of lighting the scene with less dynamic range of light is that for cameras with a narrower dynamic range will produce (output) an image that 'looks' like what the human eye sees. With careful lighting a camera with a very narrow dynamic range can produce an image similar to a professional film camera, in terms of dynamic exposure.
However, a medium that has a narrow dynamic range will produce an image with a reduced gradient smoothness. That is, the change from the dark to light areas in the image will be more abrupt than in a medium with a wider dynamic range. Narrow dynamic range mediums will have relatively few shades of gray. Below are how the results of lighting for mediums with different latitude (dynamic ranges).
The actual photographic results are not as extreme as show in these example photos. The gradation transition is exaggerated for illustrative purposes. But in each case the the scene was lit according to how the medium would render the overall image. Even though a camera that has a narrow latitude it still can be used to capture images that have detailed highlights and detailed shadows, but the compromise is a reduction in the number of gray levels between the white and black as illustrated above. �
The Stop, The Light-Meter and 18% Gray 'stop' is a term of light measurement. To be precise, it is a term of comparison. Unlike an objective light measurement like a ''''foot-candle' (the amount of light one candle produce measured one foot away from the candle's flame) the 'stop' is a relative measurement that indicates increasing or decreasing light from some other specified amount of light. For example: To increase the light output of a light fixture by one stop is to double the amount of light from the fixture. Or, to increase the light that reaches a cameras film one stop is to double the amount of light that reaches the cameras film. Conversely to decrease light by a stop is to reduce the light in half. Increasing by two stops is quadrupling the amount of light and two stops down is reducing the light to on quarter of the original light. Maybe you see a pattern, increasing by 3 stops is increasing the light by eight times and decreasing three stops is reducing the light to one eighth. So, a dynamic range of 6 stops is a difference of 1 to 64 times of light. That is, if you have a camera that has a dynamic range of 6 stops then the brightest image detail it can capture before blowing out to white is 64 times the light than the dimmest detail it can capture. A light meter is a tool used to measure the both the actual amount of light (like foot-candles) and the relative amount of light (stops) from one source to another. '18% Gray' also known as 'Middle gray' or '18% reflective' is a scientifically standard gray, usually printed on a small hand held card, that is used to indicate the middle of a cameras dynamic range response. It also appears to the human eye as the value between black and white. When used in conjunction with a light meter a 'Gray Card' is also used to set appropriate lighting for a video camera with a specific sensitivity to light, or a film stock with a specified sensitive to light. As in the case above were a proper cinema image is to be obtained using a mere consumer video camera with a very narrow dynamic range, a gray card is placed in different spots on the set and measured with a light meter. This is done to make sure no portion of the scene is out of the dynamic range capabilities of the cameras medium. That is, unless of course, there is a shadow that is supposed to be absolutely black or a highlight that is supposed to be completely burned-out white. Just in this case the light meter and the gray card would be used to make sure the dark shadow or burned-out highlight were out of bounds of the camera's capture abilities. Here is kind of how it would work:First we will work with a spot meter or at least a directional meter. The meter should have the film speed (the films Exposure Index (IE) or ASA) dialed in. (Video cameras also have a specific light sensitivity which is the same thing as a films speed, some times a cameras light sensitivity is given as an ASA rating) Then you should dial in the shutter angle/shutter speed (for most cinema cameras this speed is fixed at 1/48th of a second but 1/60th of a second is commonly used in place of 1/48th of a second because nearly all light meters are design to work with this speed) and finally dial in your iris setting (this of course depend on the type of look you want for your image, a low f-stop for a very selectable focus and a high f-stop for a very deep depth of field. The iris can be used to control exposure but this will compromise your ability to control the look of your image. Instead control your exposure by controlling the light that comes from your light fixtures) Now, the first thing to know is that the light meter reading on the subjects skin should be between middle gray and one stop over middle gray (depending on the subjects skin tone, very light skinned people often read a full stop over middle gray) Placing the the gray card next to the subject adjust your set lights to light the gray card so that when the light meter is pointed at the gray card the meter indicates a normal exposure. Now point your light meter at your subject face an make note of the difference between the reading of the gray card and the reading of your subject's skin tone. If your set is dramatically lit with some areas that are bright and some areas that are very dark you will notice that the readings taken of the gray card will vary depending on where you are an set. The gray card will read below normal exposure in areas with less light and will read over normal exposure in areas with more light than the light you have set on your subject. Here is the trick: If you move to area of your set where the light meter reads more than 3 stops below the normal exposure you will not likely have much detail if you photograph that area. In fact if the gray card where to be photographed where a light meter indicated that it was 4 stops below middle gray it would appear black in the resulting image. A reading of three stops below normal exposure and the gray card would appear very dark but not quite black. Conversely if you photograph the gray card where the meter reads it as 3 stops over normal exposure it will appear nearly white. A reading of four stop over and the gray card would photograph as white. If you had a subject whose skin tone was one stop over middle gray and you measured the gray card next to your subject and the meter indicated that the gray card is over normal by 3 stops the gray card would photograph as nearly white but your subject would be totally over exposed and appear as pure white regardless of the actual color of their skin.The 3 stop range above and below normal exposure of course assumes that you medium has a 6 stop range. If your medium had a 10 stop range you would see detail in the shadows 5 stops below middle gray and there would be details in the high lights. When setting lights on your set you should know the dynamic range of your film stock or your video camera if you are to have precise control over your image.
Lighting Style While any light will work to illuminate a subject there are artistic conventions that produce pleasing and expected results for cinema production. First, consider the functions of lighting:
- Selective Visibility
- Revelation of Form
- Establish time and place
- Mood and Atmosphere
- Composition (elements include: balance, unity, rhythm, contrast
- The tools used to produce the proceeding functions are:
- Intensity (brightness)
- Angle
- Distribution (coverage)
- Quality
- Color
 Quality of Light The quality of light is a distinction made about the lights origin. That is, light from a single concentrated origin, like from a naked light bulb, is called hard light. And light from a large surface like, from a large lamp shade or a paper lantern, is called soft light. The hard light will cast well defined distinct shadows, and the soft light will cast soft edge shadows that are not as dark as a shadow cast from a hard light source. Light sources may be hard or soft depending on the intent of the desired scene.
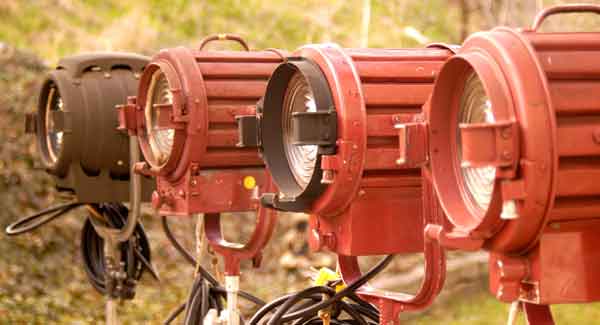
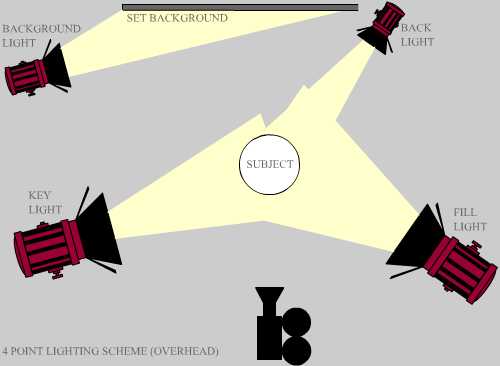
4-Point Lighting The most basic scheme for cinema lighting is 4-point lighting. 4-point lighting is not really a natural lighting scheme, but it has become the standard for cinema lighting. This lighting scheme produces interesting and attractive results unlike News camera lighting, or the sometimes unflattering practical lighting situations. This 4-point lighting is a studio lighting scheme but it can be modified to an outdoor daylight lighting scheme with special care and creativity. Let's start with the 4-point studio lighting scheme.  4-point lighting utilizes four lights: the Key, the Fill, the Back and the Background. Each has a specific function as follows: Key light -- the subject's main light source. Most often this light source is a relatively hard light source. This light is the generally produces the brightest results of the four lights. Fill light -- a light used to reduce subject shadows and contrast. Often this light source is relatively soft. Sometimes this light source is a reflector. Back light -- a light placed behind the subject that illuminates the back and hair, separating the subject from the background and adding additional highlights to the scene. This lighting effect becomes more dramatic as the quality of the back light is harder. Background light -- a light that illuminates the background or set and, depending on it's brightness, establishes a low- or high-key mood
Contrast Ratio The contrast ratio of a scene is the difference between the light and dark areas of the framed shot. Two things will determine how the contrast ratio is set:
1.) Physical ability of the medium, be it film or video, to capture the contrast.
2.) Intended mood of the scene. Scene contrast is controlled by the relationship of the key to fill light. The numerical The contrast ratio is referred to in terms of "F-stops." One F-stop down from the key light is half the light of the key light and one F-stop up from the key light is twice as much light as the key light. The F-stop difference between the key light and fill light is known as "lighting ratio". The ratio represents the Key light and the fill light respectively. So, a 2:1 ratio is where the fill light is one F-stop lower in illumination than the key light. 2:1 - one F-stop difference between key and fill. Very flat, good for studio TV lighting such as TV news or talk shows. Also suitable for comedy movies and TV sitcoms. 4:1 - two F-stop difference between key and fill. 4:1 (and 3:1) is considered a normal contrast ratio and suitable for drama or anything that requires good depth in lighting. For 35 mm blowups, a lighting ratio not exceeding 3:1 or 4:1 is recommended as scene contrast increases when transferring to 35 mm and ratios such as 8:1 or 16:1 might produce shadow areas with little or no picture detail. 8:1 - three F-stop difference between key and fill. Regarded as high contrast, it is suitable for horror/suspense films or night interiors. 16:1 - four F-stop difference between key and fill. Ultra high contrast. Video might not be able to effectively handle 16:1. These values are of course extreme for video and need to be reduced by nearly half for the average prosumer video camera.�
Lighting a Scene Start lighting with your key light. In considering the light direction try to come from an angle consistent with "practical lights" in the location such as lamps or windows. Also consider the quality of the keylight. The light quality should be similar to the practical or natural light it is emulating. If the key light is emulating sun light from an open window the keylight would need to be hard as sunlight is a hard light. However, if the key light were emulating light from a lamp shade or light from a window on an overcast day the light would need to have a softer quality. Use diffusion gels, scrims, or bounce cards to soften the light if necessary. Besides the practical or natural the quality of light may also emulate or reflect the mood of the scene. A balance between realism and intended mood needs to be struck. Soft light is more romantic and pleasant, hard sharply angled light is dramatic or even foreboding. The brightness of your key light will be determined by your medium and the depth of field you wish to shoot with. Slower film stocks will require much brighter lights that slower films stocks. Some video cameras have ccds that are much more sensitive to light than say old tube video cameras which require very bright lights. Wide depths of field or low F-stops will require less light than a lens stooped down to F-16 or F-22 for a very wide depth of field. For example: suppose you have two identical cameras loaded with a film rated at 100ASA. One camera has its lens has its aperture set at 2.8 stops and the other camera has it's lens set at f16. The camera with the F-16 F-stop will require 32X more light than the camera with the F-stop of 2.8. Now comes the Fill light which controls how much contrast the scene will have. This is were you get to break out your light meter. Set you meter to read off of your subjects face. Caucasian skin should read about 1-stop above key. Darker skin tones may read closer to or even below key. Then take an incident reading of the shadow side of the subjects face. According to the chart above increase the fill light on the shadow side until the desired reading is achieved. Backlights can be used to separate actors from backgrounds and to add depth. This effect done in conjunction with a narrow depth of field on the camera will produce stunning results, and strongly draw the viewer's attention to the subject. For special effect light blue and amber color gels work nicely with backlights. Finally the background light or lights can be set. In some cases, like on a small set, enough light will spill over and be reflected from the Key and Fill lights that no background light is needed. But on a larger set Background lights are need to illuminate the rest of the set. The amount of light used to light the background can be determined in the same way the contrast ratio between Key and Fills lights is determined. The incident light meter reading off of the background , in general, should not be brighter than the reading off of the subject. And the ratio of the readings of subject to background will determine mood of the scene just as the Key to Fill light relationship.
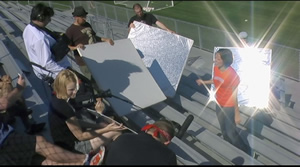
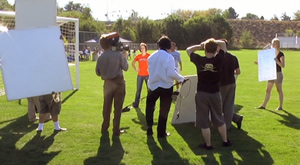
Lighting a Scene Outdoors The sun is the greatest factor to consider when lighting a scene outdoors. Most often the sun can be used as a key light but in some cases it can be used as a backlight or even a kicker as in sun low sunset to the back shots. When using the sun as a Key light bounce cards are often the most practical way of creating Fill light. It may be very difficult, and may even look unnatural, to light with backlights outdoors. Consider that a back light in an indoor shot may have a "practical" explanation. But a backlight out doors could not be easily explained so may seem a little weird and distracting to a viewer.
Outdoor lighting can be very difficult as the contrast between the sun and the shadows it casts is far to extreme even for a high quality film with a very wide latitude. One solution to this problem is to light the shadows. This requires high powered daylight balanced lamps which may be beyond the scope of most production. But an example of this type of lighting is evident in the Leone's spaghetti westerns. Another cheaper solution is to use a large diffuser between the sun and the subject. This is a very effective technique but only works on an area as large as the diffuser used.