Sound Studio
updated 12-30-08
 Studio recording is the name giving to audio recording done in an acoustical controlled room(s) that are fitted with the necessary equipment to make a recording. Sound studios are used to record music, radio plays, commercial voice-overs, and may even be used to record some sound effects or foley. The two most important parts in studio recording are the equipment and the room or rooms in which the recording and monitoring of the records are done, and the recording room where the sounds to be recorded are made.
EQUIPMENT
The basic categories sound recording equipment are: microphones, amplifiers (and preamplifiers), mixers, recorders and processors.
Common microphones used in studios are condenser microphones. However, dynamic mics get there fair share of use and ribbon mics are recommended by some studio pros for certain applications. Affordable condenser mics have some sort of cardioid pattern and more costly condenser mics will have a multi-pattern pick response which ranges from hyper cardioid to omni to figure eight. These mics require a special power source to charge the working element of the microphone. Some times they may take an internal battery, very expensive condenser mics will often have their own external power source, but most condenser mics used in studio applications use phantom power which is typically a 48 volt power that is supplied by the mixing console.
Preamplifiers (Microphone preamps) do just what they say, they amplify the signal coming from the microphone to a level that is usable by the rest of the studio equipment. Studio mixers as a rule have microphone preamps built into them but recording engineers often opt to use a separate microphone preamp for its superior quality and its unique features that may be lacking in a typical mixing console preamp. since the advent of personal computing and high quality/low cost Analog to Digital converters, mic preamps are often the only thing between the microphone and the converters on the computer. With the new mixing software that is available for computers the actual large mixing consoles may give their space in the studio away to some other sort of equipment, like larger video monitors.
Audio mixers combine the multiple sound signals that are generated in the studio and are combined into a useable format for the consumer. Sometimes these mixers are little portable table top units but in large studios they are free standing consoles that can be the size of two or three large office desks. While the basic function of a mixer is to combine source material they often perform extra tasks such as volume control of each of the signals. More specials tasks that some mixers offer is tone control, phase control, and phantom power supply. And of course top end mixers will have the most used audio processors, like compressors and limiter, and effects, like reverb, and echo built in not mention their ability to route signals to external effects and processors.
Recorders these days come in many forms. In the earliest days of audio recording sound was mechanically captured onto a wax cylinder by means of channeling the desired sound down a cone cone (or some time called a horn). This cone would compress the force of the sound waves to give them enough energy to physically move a small diaphragm attached to a needle that would make impressions on to the rotating wax cylinder. For play back, the cylinder was again rotated. A similar needle, to the one used for recording, would be moved by the pattern in the wax. The needle would in turn move a small diaphragm in the narrow end of a and as the sound traveled through the cone it would be amplified, by means of the resonant properties of the cone, to listening volume. The next major evolution, not mentioning optical film recording of audio for use in films, was magnetic tape. Through the use a microphone and amplifiers sound could be converted into an electrical signal that could be used to affect a magnetic device called a "head" that would leave patterns on a iron-filling impermiated film called tape. In the record mode, a small signal is generated by a microphone which is then increased in strength by an microphone preamplifier which is then further amplified by the amplifier used to excite the magnetic head. The tape moves across the head and as it does the excitation of the head leaves a pattern on the tape. To playback the recording the tape is then moved across a playback head which is similar to the record head but it detects the signal on the tape. Its detection is amplified by the tape machines amplifiers, and is then sent to some sort of mixer. The signal is then finally sent to a power amplifier , which drives large magnetic coil transducers (speakers) which ultimately move air particles resulting in a playback of the sound originally recorded. The contemporary means of recording sound still uses the same sorts of microphones, and microphone preamps that were used by tape machines but the tape machine itself is no longer used (except by a few extremists who cling desperately to the past, like yours truly) Instead, were the signal would have before be sent right to the tape machine it is now sent to a digital converter. Digital converters were first employed regularly in the early seventies as a means to reduce the noise problems associated with magnetic tape machines. The digital signal was at first still sent to the tape machine, but in the digital form the signal was not subject to the noise problems inherent in analog magnetic tape recordings. In the late 80s digital recordings were most often done on VHS tape recorders but these recorders made way for the now dominant digital recording medium, hard disk drives. These drives are the drives found in personal computers. The computer can record and manipulate the digital signal from a converter in ways never imagined by users of tape. Most notable is the random access to recorded material. This allows for very involved processing and special effects such as looping.
ADDA converters have become an essential part to contemporary recording studios as nearly all recording is done digitially. ADDA stands for Analogue to Digital, Digital to Analogue. The AD portion of this device turns the analogue signal of the microphone and its preamp into a digital signal that can be recorded onto a DAW (Digital Audio Workstation) which is just a computer with software that records the signal from the AD converter. The DA portion of the ADDA converter turns the digital signal back into an analogue signal so that it can be amplified and heard through speakers or headphones.
Processors and EffectsProcessors are devices used to enhance the audio signal or shape the signal for a specificpurpose, such as compressing the dynamic range of signal to increase its intelligibility for broadcast. Compressors can also be used in other applications. Their basic job is do reduce the dynamic range of a thesignal being fed to it. That is they raise the volume of the quitelevels making all the signal more uniform in volume. Compressors work much like or often in conjunction with Limiters which reduce the loud levels of a signal making the overall signal more uniform in volume. Effects are devices that alter a signal from its original form to create a new sound such as echo.
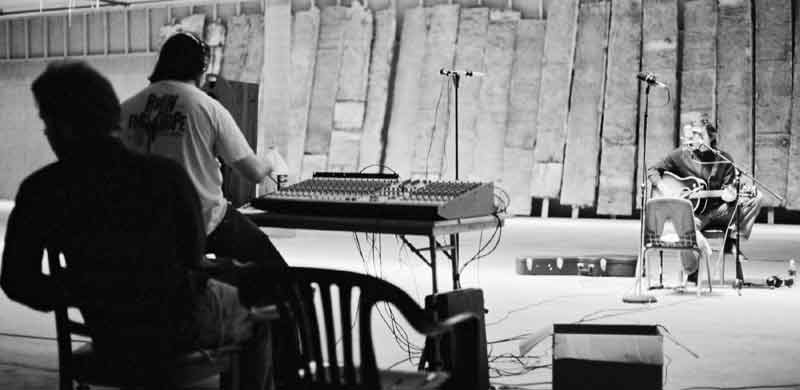
photo by Blair Whitting
Ā
The Room Special consideration should be given to the room used to make an audio recording. A room can act as a resonant cavity amplifying the sounds which are produced in it much like the body of a guitar amplifies the sound produced by the guitars strings. (This phenomena is often referred to as room tone.) The larger the room the deeper are the frequencies which will be amplified. The smaller the room, the higher are the frequencies that will be amplified. Hard surfaces in the room reflect the sound adding to the resonance of the room. Soft surfaces like curtains, couches and rugs absorb sounds decreasing the resonance of a room. A tilled bathroom and a full walk-in closet are on opposite extremes of the spectrum in regards to this subject. When you talk or sing in a bathroom, especially one with hard tiled surfaces you know that the rooms "reverberates" this is characteristic of a small highly resonant room. You may have noticed that when you sing in a bathroom such as this, there is a note you can sing that is much loader than all the others you sing. This note is representative of the resonant frequency of the room. In some cases a room may have two or three resonant frequencies. An Ideal room for recording is equally resonant across all the audible frequencies or at least a large range of them. Some times a very resonant room is not desired for recording so dampening is added to the room, however dampening should be added so that it dampens all the audible frequencies evenly. Thin foam is often used to dampen high frequencies but using this as the only treatment will leave midrange resonance in a small or medium sized room which results in a boomy, and unacceptable recording. Much is involved to create a room that will resonate evenly across the audible frequency spectrum, the ceiling is generally not parallel with the floor and the walls are not parallel with each other. And much is done to break up the large hard flat surfaces which cause echoes of a certain frequencies, much in the way the size of the room affect the frequency of resonance. The details of complete construction technique are beyond the scope of this page, but hopefully what has been described is useful in understanding the complexity of studio recording. Click here for more information about sound theory.
Ā
TECHNIQUE
Mixing is the process of combining the sounds of source recordings and balancing them in a desired arrangement. It also refers to reducing the number of source tracks to a desired final format such as stereo, Dolby 5.1 or even quadraphonic.
Whether you are using analogue hardware type devices or virtual digital devices the underlying principle are the same. Technique may vary platform to platform and even between brands of devices in the same platform but a clear understanding of the basic ideas of mixing will allow a "mixing engineer" to work on any platform, digital or analogue.
Mixing may involve utilizing effects such as compression, equalization , reverberation, multi-band dynamics, stereo simulation, exciters , and others. These effects are used to intensify, bring forward, push back, or attenuated a selected instrument or voice in "the mix."
Compression (DYNAMIC LATITUDE CONTROL), in audio terms, is the reduction of the difference between the loudest and quietest portions of a source signal. This is done with level detecting amplifiers often called limiters or compressors. Though limiting and compressing are similar the difference is as follows: Limiters attenuate (reduce the volume) of only the loudest portions of a source signal and Compressors amplify (increase the volume) of the only the quietest portions of a source signal.
It is hard to learn to properly operate a compressor or an equalizer, all that can be said is that it take much practices and comparison against comparable materials. For example: if you are mixing a rock tune and you are trying to mix a guitar and the signal for the guitar needs to be compressed to raise the overall perceived volume of the guitar, your alterations to the signal should be compared to a commercial standard, Commercial standard meaning some popular recording that many of a general audience are familiar with. Likewise when mixing dialogue for motion picture have at hand a recording of dialogue from a popular commercial film. Basically there are not any hard and fast rules for treating dialogue but here is a kind of direction to get you started: First compression, in this case is simply reducing the dynamic range of a signal. So, the loud part of you signal will be attenuated (reduced) and the quiet parts will be amplified when compressed. These two extremes, loudest and quietest come closer together the more the signal is compressed. The result is that subtle parts of articulation that are often hard to hear especially when set to a sound track and also foley and effects can be heard more clearly than when not compressed. Also, loud sharp noises and abrupt vocalizations, which can be unpleasant and harsh when recorded using conventional recording equipment, are smoothed out and are given are more natural pleasant sound when compressed. When applying compression it should be done subtly as to much compression result in a very unnatural sound that is often described as pumping or thumping. This pumping is basically the volume of the signal being turned up rapidly by the compressor and making the normally low level bass frequencies and noise painfully obvious.
Multi-band Dynamics Compressors and limiters usually work on a signal track and affect the whole frequency spectrum of that track equally. Multi-Band compression or limiting (dynamics) is a series of compressors and or limiters that are each tuned to work on a set range of the frequency spectrum. These devices are generally used in the master process after mixing is done.
|
|
The advantage of a multiband dynamics is to control the dynamic function of one set of frequencies without affecting other frequencies. Imagine a musical recording that has bass, guitar and drums. If a regular full frequency spectrum compressor/limiter is used to control the the explosive booming from the based a side effect is that the high and mid frequencies of the drum cymbals and guitar are attenuated along with the bass signal. Every time a loud bass sound is turned down by the dynamic processor so are the other frequencies. Multi-band dynamic processors solve this annoying sonic problem by breaking the frequency spectrum up into part and treating each part separately.
Ā
Equalizers also called EQs are a device used to amplify (increase) or attenuate (decrease) a specified frequency, or frequencies, of an audio signal.
You are likely to be familiar with the tone knobs on a small radio, the "treble" and "bass" controls. Well these are a kind of equalizer. The treble knob controls a range of high frequencies (around 4Khz and up depending on the manufacturer) and the bass knob controls a range of low frequencies (around 300Hz and lower). If your radio has a mid range control it usually controls the frequencies between the treble and bass frequencies. Some times there is some over lap, some times the frequencies and adjacent, and sometimes there is some space between the frequencies of each of the tone controls. Again, it depends of the manufacturer.
Multi Band Equalizers are several tone controls grouped together. Each tone control is referred to as a "band" of frequencies. Each band has a narrower set of frequencies it controls as the number of bands are increased. The control for each band simply attenuates or amplifies the frequencies that band represents. A five band EQ splits the audio spectrum (20Hz to 20KHz) into five bands usually with a little bit of overlap, but again manufacturers differ. A 33 band EQ splits the audio spectrum up into 33 band of audio control. This works out so that each band controls 1/3rd of and octave. Like in musical terms it is true in audio engineering terms that an octave is a doubling or halving of a given frequency. For example: Take middle A (440Hz) an octave higher (A above middle A) would be 880Hz and an octave lower A below middle A) would be 220Hz.
Parametric Equalizers are the most useful and the most complicated to use. The hardware version of these EQs usually only have three or four bands. However, the width of the band or (Q) is dialed in by the user. Also each band can be assigned a center frequency by the user. The center frequency is where the bandwidth or Q is centered around. And finally the amount of amplification or attenuation is controlled by the user. So there are three controls for each band. The previously described EQs have one control for each band. You can see the high level of control that parametric EQs offer. Here is an example: you can assign 440hz to one of the bands and dial in a Q or two octaves and attenuate by 3dB. And you could assign another band to 2.5Khz, dial in a Q of 1/2 an octave and increase the gain by 5dB. A common introductory use of a parametric equalizer is to assign one of the bands to 60Hz, dial in a narrow Q 1/6th an octave or so, and drastically attenuate by 10 or 15dB. This is done to remove the low frequency hum that is often caused by household appliances and power transmission lines. Many audio recordings made with unbalanced cables and equipment suffer from this sort of noise.
The last general thing to consider about equalizers is whether they are passive or active. Any of the above equalizers can be passive or active, but tone controls, like the treble and bass controls, and multi-band EQs tend to be passive, while parametric EQs tend to active. However, active multiband EQs are not uncommon. The real difference between passive and active is that passive EQs can not really amplify an audio signal or specified set of frequencies of a audio signal. They can only attenuate. Active EQs can attenuate and amplify. For control purposes Active EQs are superior, but they tend to add noise to the signal chain because of their "amplifiers." So many engineers make due with passive EQs if they are trying to preserve a prestine recording, and do not want to introduce any noise to the audio signal.
Reverb Often there is a distinction made between reverb and delay. Delay is a discrete repeat of a source signal. This delay can very in length but for recording in music and effect for film it is usually between 20 milliseconds and a couple of seconds. Multi-Tap Delay is a series of successive delays. When the delayed signal is reduced in volume compared to the source signal the impression of an ambient space is created. That is, our brains can give a sense of physical space based on the length of the delay. A short delay of a signal source, say a single clap of the hands, in a real physical space would be reflect from a surface that was relatively closer than a long delay which would be reflect from a surface further away. Multi-Tap delays give the impression of a signal source being bounced off of a series of surfaces each further and further away.
Reverb is the culmination of many delays giving the impression of a signal source being reflected off of the same surface, of say a room, and reflected again and again until the acoustic energy is expired.Since reverb is a simulated ambient acoustic effect a natural effect is achieved when just a little thought is put into the process. Most acoustically reflective surfaces that we encounter day to day reflect sound in the middle frequencies better than in the low and high frequencies. So an equalizer applied to the reverberated portion of a signal would need to have the high and low frequencies rolled of a few dB or all together to give a pleasant and realistic effect. However, if you are trying to simulate a space with very hard surfaces more of the source signals high, and low, frequencies would be reflected. This must be considered when EQing the reverberated signal. But all to often to much high frequency reverb energy is introduced into a mix. While this does create a very shinny sonic image it is not realistic and it tends to cover up important information in a mix such as the vocal intelligibility frequencies (1.5khz to 3khz) which results in a "Hard to listen to mix."
In the real world echo is a reflection of a sound. We typically think of going to the edge of a large canyon, yelling into the canyon, and waiting for the sound of the yelling to bounce off of the canyons far wall and return to our ears. Another example I find common, is being on a school yard next to a large school building with large flat surface walls. When standing a 100yards away or so, you can yell or make a sharp sound that will return as a discrete echo. Sometimes canyon echoes are not discrete because the canyon walls can be broken up into several surfaces that return the original sound at different times. This would be called a multiple echo. Multiple echoes happen in the city all the time when a sound is made several echoes can be heard bouncing off of the many varied building surfaces. We normally don't hear this though because the noise of traffic is overpowering. The thing to note is that "echoes take longer to return when the bounce off of surfaces that are further away, and conversely echoes return more quickly when they bounce off of surfaces that are closer." Another thing to note is that "all other things being equal like temperature, reflective surface material, sounds that bounce off of closer surfaces are louder than sounds that bounce off of surfaces further away." The last really important thing to note about echo phenomena is that frequency range and volume of an echo is dependent on the properties of the reflective surface. Hard, thick surfaces reflect sound well across all frequencies. These are surfaces like concrete, smooth stone, thick glass. Surfaces that are still hard but as hard as stone still reflect well but they don't reflect high frequencies as well. Wood surfaces reflect mid and low tones much better than high tones. This is why we often describe wood paneled rooms as being "warm." Soft surfaces will hardly reflect sound at all. Sand, foam, plush furniture and tend to absorb sound rather than reflect it.
Reverb is actually a kind of echo. Well more precisely it is a group of echoes that are so closely spaced that no echo is discernible from any other. What is perceived in stead is a kind of ringing sound that falls off after an original sound. Reverb is typically noticed in enclosed rooms with highly reflective surfaces. The first reflected sound from an original sound (lets say your voice) occurs so quickly that you don't even perceive the sound as being separate from you actual utterance. But then that sound is re-reflected and reflected again, and again, and again off of the walls, ceiling and floor of that room. These reflections continue to happen until all the energy of the original sound is absorbed into the walls or any other surface, like you the listener. The less absorptive material in the room the longer the reverb will be. Conversely the less reflective material in the room the shorter the reverb will be.
When doing dialogue replacement, or foley sounds on a movie, those sounds are usually recorded in a dry dead studio environment ((non-reverberant).). This is OK, in fact it is good. because then the sound editor can look at the room in the shot and assign an echo, or reverb that matches the visual characteristics of a given scene. If a character is outside standing far in front or to the side of a large building then there should be a single discrete attenuated echo. When foleying in footsteps in a long hallway with marble floors and bare walls then long reverb should be added to the footstep sounds. The actual very best way to get the right echo or reverb on foley or ADR is to go back to the actual location and record the sound there.
"Recently I recorded on a sound stage that had a small room, three wall, built in one end. The shot was of a small room, but the actual echo in the room gave away the large size of the sound stage. In that case I have to record the dialogue in a completely non-reverberant studio space and add the proper reverb in mixing, or find an actual room that has the same sonic characteristics as the sound stage room is suppose to have." nathan snyder after working on"Amnesiac A"
The biggest problem with reverb and echo in foley and ADR is when the recorded sounds are recorded in a room that has it's own reverberant character that does not match what it is suppose to sound like. For example: When recording ADR in you living room, even though the floor is carpeted and the there are pictures on the walls, there will be a lot of reverberant sound recorded that will give the character of the recording room away. It may be recording ADR for an outside scene, but it will always sound like you recorded it in a living room. There is no way to remove reverb from a recording. Rooms that are non-reverberant are generally treated with thousands, and thousands of dollars worth of special sound absorbing material. This is not something easily done at home.
Simulated Stereo Often when a source recording has been recorded in mono, like for a location recording, a dialogue track for a motion picture are when there are a limited number of tracks to record source material a stereo effect is desired in the mixing process. There are two easy ways to accomplish creating a live ambient stereo sound from a monophonic source.
DELAY- This is the easier of the two methods and can be accomplish in a variety of ways. The basic idea is to copy your source material so there are two synchronized versions of the same signal. Pan the two signals to opposite channels L and R. The amount of panning may vary. Extreme panning results in the widest perception of the effect. Finally one of the signals is delayed slightly. The amount of delay changes the perception of the simulated stereo sound field. When the delay is in excess of 20miliseconds the stereo effect is replaced by an echo effect.
This process can be made fancier by adding different types of reverb to each of the channels or even creating three copies of the source material and panning them left right and center and then delaying the left and right signals by differing amounts.
PITCH SHIFT-This method of creating stereo from mono results in a very rich sound and is suitable for making the combined signals very present in the mix. It is accomplished by creating a copied pair and panning apart like above but then instead of delaying one of the pair one of them has there pitch shifted by one to four percent. The amount is to taste really. For an example of the pitch shift method listen to "nathan_and_stephen_4" here. The electric guitar was recorded mono, and then the signal was widened in the stereo mix down using the pitch shift method.
COMBINATION EFFECT - Of course the two methods can be combined for very complex simulated stereo fields.
Doubtlessly there are other methods like creating real acoustic chambers and playing source material into them and capturing the ambient sound with stereo microphones, and even playing with the phase of a copied pair of source signals to create wider than wide stereo fields, but the two process described above are a good start and easy to do on any computer platform and easy to do with hardware with a stereo mixer of a half dozen channels, a delay unit, a pitch shifter, and possibly a reverb unit.
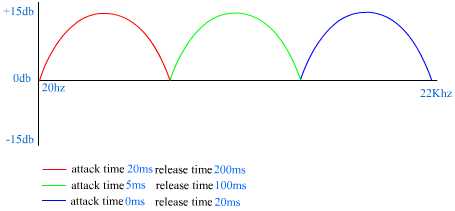
EXCITER An Exciter is used to improve the perceived crispness of a recorded signal. It can either be used on individual tracks during mix down or on the mix itself during mastering. Stand alone exciter units have a few controls usually level and some sort of spectrum selection. However, an understanding of the mechanics of the exciter will make plain the use of any exciters controls. An exciter is really no more than a high band-pass filter and a compressor run in series and mixed with an original signal. On a Digital Audio Workstation (DAW) this device is easy to create. In a sequencer, like Cool-Edit Pro, Vegas, Multi-quence, or what have you, import a signal into the timeline. Duplicate the signal so there are two tracks of an identical signal. We will call track one the original signal and track two the effect signal. On track two we need to insert, or enable, a high band pass filter. This would be to simply EQ out all of the mid and low frequencies in the signal. The frequency selection should 6khz and up, but can be higher or lower depending on taste. Then a compressor is added after the filter. This is important that the compressor is only compressing the high frequencies of the signal. If the compressor were placed before the filter an entirely different sound would be achieved do to the low frequencies affecting the performance of the detector on the compressor. The compression factor/amount should be set fairly high, and the attack level should be very short, as should the release level, but these levels can be adjusted to create subtle differences in effect. This whole signal is then mixed with track one. The result should be a very present and penetrating sound. A hyper clarity to the detail in the high frequencies is the desired result of this effect, so mix accordingly. Be careful not to over do it though. Mix the two signals together by starting with track one at 80% and track two at 0%. Increase the gain in track two until it is just noticeable, then increase the gain until it is shrill. Somewhere between these two levels is the appropriate mix setting, and it is probably closer to the just noticeable end.
NOISE REDUCTION
Removing noise is done several ways. The most common type of noise is hiss or a buzz. The easiest though least effect way of removing this type of noise is with an EQ. Hiss can be removed by attenuating (turning down) the high frequencies of a signal with an EQ. A multi-band EQ is the best to use because it allows for removal of relatively narrow bands of sound. You would simply pull down one frequency band (knob) at a time until you find the frequency or group of frequencies that are predominantly responsible for the hiss. In contrast is a simple shelving EQ. This is a high frequency tone knob like the one labeled "treble" that you would find on a small radio. This EQ control will group all of the high frequencies together and gives less precise control than a multi-band EQ. This method of removing noise has the disadvantage of also removing any high frequency signal that you may want to keep. The EQ does not discriminate between good signal and bad noise only between frequencies.
There are a few types of Dolby noise reduction that make use of compressors and expanders, they are fairly complicated and are typically used for analogue tape recorders. For information on these noise reduction circuits, refer to the manufacturer's manual for the device you will use.
The most precise and best sounding noise reduction method is found on many computer based audio editing platforms. The CoolEdit Pro noise reduction is a good example of how these types of noise reductions works and is a readily accessible and affordable program. This type of noise reduction works by identifying the noise and letting the computer remove it. The noise can be anything from hiss to a jet flying overhead. When using this software the first step is to select a section of noise from the file being altered. Care must be taken not to select any part of the file that has signal that needs to remain after the noise is removed. You may have to search through the file to find a section where there is only noise and no desired signal. Only a second or sometimes less is required. Once the noise is selected you instruct the computer to make a profile from the selection. Then the entire file must be selected and have the computer remove the noise based on the profile. Faster computers will allow for a real time preview, which allows for easy adjustment of the amount of reduction required.
Ā