Location Recording
 Portable gear is the most essential issue to location recording.� Battery powered equipment is not as plentiful as AC� gear. So, finding professional quality equipment, at a reasonable price, that can be used remotely is one of the major aspects of location recording.
Besides getting equipment that will work right in the field, there are issues of recording sound in environments that are not designed for sound recording. Microphones record sound just as it is, and when played back over a speaker the recorded sound may not sound like we think it should.� Our hearing perception is a very complex bit of busyness that tunes out certain aspects of sound and focus on others. Most rooms in houses, office buildings, institutional buildings are not designed for recording sound. A room acts as a resonating cavity like the body of any acoustic instrument. A room must be tuned by designing it to have a certain volume of air and giving its walls and ceiling and floors very specific distances and angles to each other. It is fairly intuitive to folks that a small room has an intimate sound and a large room has a large cavernous sound, but it is not obvious to the casual listener that these room sound characteristics play havoc when trying to record in a room if they are not properly accounted for. If a room is not properly tuned then it tends to lend to poor recordings by over emphasising certain sonic frequencies. These over emphasized frequencies are kind of "filtered" by human hearing perception.� We simply don't notice it unless we are trained to hear it or we hear it from a recording. Recording out of doors is not usually so problematic unless considering the issues of wind precipitation, freezing temperatures, excessive heat, and all of the things in the outdoors that make noise that can show up on a recording done outside.
Some gear like small mixers and small audio recorders that run on 120VAC power can be powered remotely using a power inverter. Typical power inverter change 12V DC current, like the kind found in your cars cigarette lighter, into 120VAC, commonly called house current. Low wattage inverters, for powering small devices, can be purchased for as low as $50.00. Large inverters to power computers and monitors cost much more but are available. Be careful in selecting an inverter as some tend to produce unwanted buzzes and hiss in sensitive recording equipment. Find a retailer that will let you try out the inverter with your equipment before you buy.
Treating room tone can be a lot of work depending on the circumstances. The easiest way is simply move the microphone closer to the source. But in some cases this is not possible especially for sound for movies where the microphone can not be in the shot.� Treating with sound absorbing material is the next option. This can require allot of material and effort in placing the material. Commonly used is egg-crate foam which works well for high frequency but does little for the especially troublesome midrange ringing tones. The cheapest method for treating the full range of overly resonant noise in a room is with layers and layers of heavy textile material. Moving blankets are great. Large sections of carpet are also very good though harder to manipulate.� The basic idea is that the more weight in absorptive material you have the sound that will be absorbed by that material.� The good news is that not all the the room used for recording in needs to be covered to stop resonant� noise. At most 50% and often much less of the surface area of the room needs to be covered in absorptive material to make it suitable for good audio recording. A good way to conceptualize how to treat a room is to imagine all of the rooms hard surfaces including the ceiling, floor, counters and furniture, as being mirrors. If you have ever stood between two mirrors that are parallel to each other you know that they reflect each other infinitely or nearly so.� This is similar to how sound get trapped between the walls of a room. But the sound bounces back and forth reinforcing itself making the resonant tone that causes audio havoc. By simply placing heavy absorptive material on one of the surfaces that contribute to the sound reflection you can stop the unwanted resonance.
�GENERAL INFO ON LOCATION AUDIO:
Portable equipment
Portable equipment needs to operable from batteries and light weight.
Local ambient noise
Sound from a location will creep onto a recording of dialogue if care is not taken to prevent it. Most often it is desirable to eliminate or avoid, as much as possible, the local ambient noise. However, this sound is often recorded separately from the dialogue to be used in post production as an emollient between individual shots. That is, an audio recording made the length of a scene is laid down as background sound turned down in level below the dialogue but just barely audible, to tie together the individual shots of the scene. Doing this results in a continuous "feel" that sonically ties individual shots together to comprise a scene.
The Recorder and Mediums
Most often, for location recording, a small portable recorder is used that has "on board" mixing, phantom power, attenuation pads, and bass roll off equalization. These are the most commonly used features for location work so having on the recorder just makes good sense.
Synchronizing with the camera (slating)
When using a split system (a separate audio recorder from the camera) a method of synchronization is imperative. An old fashioned "slate" equipped with "clapper sticks" is all that is really needed. Before each shot the scene and shot information should be written on the slate so it is legible for the camera operator. Then the clapper sticks should be held apart, and all the while all of this is visible to the camera, the information on the slate should be read aloud so the audio recordist can hear it through his/her headphones. After the slate info is read aloud the clapper sticks should be brought together briskly to produce a clear and distinct "crack" that is visible to the camera and heard by the audio recorder. This will mark the first sync point for the post production editor. After each shot before the camera and the audio recorder are stopped the slate should be held again in front of the camera with the clap sticks apart but this time upside down, to indicate the end of the shot. The clap sticks should again be brought together so they are visible to the camera and audible to the sound recorder. This marks the end sync point for the shot. By creating these visual and audio cues, aligning the audio and visual in post becomes relatively easy and organized.
Microphone types and placement
Types of microphones fall into two types of divisions:
1.) transducer types and
2.) pick up pattern types.
The three types of transducers are Dynamic, Condenser, and Ribbon. Though ribbon microphones sound great they are very delicate not use very often, any more, for motion picture work. Dynamic mics are tough and tend to soften hard mechanical sounds making those sounds more natural for recording. But, condenser microphones are the, by far, most commonly used transducer type of microphone used for motion picture.
The most useful pick up pattern types are: Omni directional, cardioid, and hyper cardioid. Omni direction mics pick up sound equally from all directions. Cardioid mics pick up sound more readily from what they are aimed at, but still some sound from all other directions. Hyper cardioid pick up sound all most exclusively from what they are aimed at and reject most sound coming from other directions.
The first rule about mic placement is: Always place the mic as close as possible to the subject.
With the first rule of mic placement in mind there are other things to consider about mic placement. In the old days, before the extensive use of Foli, a single mic was placed in the general vicinity of the action and would pick up the dialogue and set sounds and subtle movement sounds of the actors. The mic placement was approximately the distance from the action as the perspective of the camera's taking lens. This is important for two reasons:
1.) These days the location mic is really only used to capture dialogue only. The boom operator is not concerned with anything else as it will be added in post.
2.) camera perspective plays a lot into the proximity of the mic. If a telephoto lens is used for a close up then the mic can be placed much closer than if a wide angle lens is used for a wide shot. The mic actually sounds different if place close to or far away from the subject. When the mic is close to the subject the levels can be turned down because the mic is close to the subject. Since the level is turned down the mic "hears" less ambient sound like subtle reflected sound from the subject. When the mic is further away from the subject the levels have to be turned up so the mic "hears" more of the sound not directly coming from the subjects mouth. All of this extra reflected sound gives a distal perspective character to the sound. A close mic give an immediate intimate sound. When possible the mic placement should reflect the mood the camera has framed. i.e. if the camera is a long ways away from the subject the subject should sound along ways away. If the camera is zoomed in close on the subject the mic should very close to the subject to give a very intimate close feel.
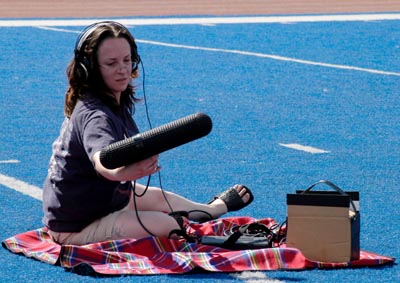
Using a Boom
A boom is used to get the mic as close the subject as possible without being visible to the camera. This can be accomplished by placing the boom overhead and out of the camera frame or close to the ground and out of camera frame. Each method has different sonic consequences. Experimentation is advisable for each individual location.
Using a Blimp (dealing with wind)
A microphone blimp is a sound transparent case that envelopes the microphone. It is designed so that even though it is transparent to sound it none the less blocks wind. Small phone wind screens work well for light breezes but larger blimps are required to block the plosive effects of wind on a microphones diaphragm.