Anamorphic lenses are used to create Wide Screen Films. Widescreen films are made several ways but anamorphic widescreen is the best alternative those film makers who do not want to move to some exotic format sized medium or who do not want to waste resolution by cropping of the top and bottom of their image making a letterbox wide screen.. Put simply an anamorphic lens can squeeze a wide image to fit onto a typical format like 4:3 mini-DV cameras. Then when played back the image will need to be stretched out to it's correct width. Anamorphic widescreen can be used with any camera or any projector. And in the case of TV or computer monitor play back the image can be stretched out during editing to create that letterbox look everyone is familiar with.
NEW (sort of new) Below is a tutorial link or an instructional presentation I built for demo purposes over a year ago. The navigation is kind of weird because of some of the requirements placed on me for the purposes of the demo, but the info is good, better than even on this page. You will be asked to enter your name at the begining but you can put what ever there. The system is not really set up to track or provide email feedback so don't worry about it.
If you like it or think it can be improved let me know,
Nathan
Cinemascope is the name of the anamorphic process that 20th Century Fox used to create the widely distributed widescreen movies in the 1950s. Cinemascope is also a brand of anamorphic lens. There are other well know brands like Panavision, and Todd AO. However, all of these lenses are the same in that they are anamorphic lenses. An anamorphic lens compresses an image going into a camera 2x along one axis only. For widescreen movies they are set up to compress the horizontal axis.
Then upon projection an anamorphic lens is used to expand the image by 2x, so as to render the extra wide natural looking image. When the image is captured with a digital video camera the digital image must be expanded by 2x to render the image properly. This can be done using an anamorphic lens in front of a video projector or using editing software if the image is to be shown on a TV or a computer screen.
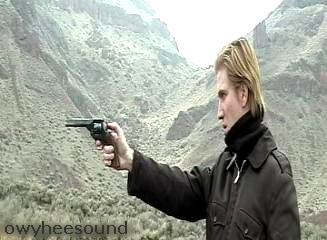
Note that this process expands the image horizontally unlike letter boxing which removes the top and bottom of image reducing it's size horizontally. The anamorphic system was designed to be a more expansive, grander image projection system. The photo far above and the video immeadiately above are from some test footage shot with a Panasonic PV-DV51D mini-DV camera and a Bousch and Lomb Cinemascope attachement I 35mm theater projection lens (used as the anamorphic adaptor. Here is the full resolution (1440X480) flash video: mini-DV_2X_anamorph_examp
Not all anamorphic lenses are 2X. Another popular format is the 1.5X anamorphic lens. When this lens is used in conjunction with a medium that has a native format of 1.33:1 the final stretched image is very close to the 2:1 format. And if a 1.33X anamorphic lens is used with the 1.33 format the resulting stretched image will be very close to the popular 16:9. To the right a 1.5X anamorphic adaptor is pictured. This particular adaptor was commonly used on bolex 16mm cameras.
A cheap and easy way to get experience using an anamorphic lens is to use readily available anamorphic projector lenses. Though these lenses were not designed to be used for cameras they can none the less be easily modified to be used with a camera. These projector lenses have the same basic abilities as the original Cinemascope lenses. However, they do not have the sophisticated design of modern Panavision anamorphic lenses which yield a shaper image with less anamorphic distortion and focus issues typical of the old Cinemascope process.
When using a anamorphic lens adapter you change the overall focal length of the lens system as a whole of the horizontal plane by increasing the field of view by 2X. That is if you place a 2X anamorphic adapter in front of a 50 mm prime lens the whole lens system has a horizontal focal length of 25 mm. This means that your anamorphic lens system has two focal distances, one for the vertical and one for the horizontal. If the iris is sufficiently open and the depth of field for the two focal distances are each so narrow that they do not overlap there will be no way to focus the anamorphic system. The idea is to increase the depth of field for each of the focal lengths so that they overlap. This overlap of the acceptable focal fields is the anamorphic system's "sweet spot of focus." However, prime lenses designed to be used with anamorphic adapters are hyper focal lenses. That is they have a fixed focus where everything at that focal distances and further is in focus.
A narrow depth of field gives a cinematographer the ability to use selectable focus. Selectable focus is a photography too that is closely associated with the "real" film look and can be a great tool for transitions, and focusing the audiences attention. But when trying to focus a simple anamorphic lens the camera's iris will need to be closed down substantially to focus both the horizontal and the vertical image planes. This will create a large or even infinite focus field depth but that's the price for affordable wide screen. Check out the old Cinemascope prints from the 50s and 60s, everything is in focus, because of a very wide fields of focus depth.
Modern anamorphic camera lenses have special design features that overcome the old focus problems. But, unless you have really good modern design anamorphic lenses for camera (costing $20K US and up) your focus is going to be soft, or worse, you may get double imaging. Also, when you stretch your image in post your pixels will have a virtual widening of a factor of two. This creates an effect that is very soft, but not out of focus, and has a "filmick" quality all its own. So what you loose in a narrow depth of field you make up for using an anamorphic lens.
The focal ring on the anamorphic projector lenses really has little to do with focus at all. In fact it is used to set the anamorphic magnification. The anamorphic system suffers from having different amounts of anamorphic magnification at different distances in front of the lens, more magnification, closer in, and less, further out. To remedy this there is a ring to change the level of magnification so that it will be 2X at any given distance. This ring should be adjust in tandem with focus to give proper anamorphic magnification at all focal lengths.
Vingetting is a problem with the wide angle ability oft zoom lenses on most digital video cameras and the long barrel of standard anamorphic projector lenses. It is especially a problem since the LCD view finders do not show the true over scan of your image (the actual height and width of the captured image). But this is only a problem if your final presentation is going to be on the computer which is generally the only medium that shows the whole image. Projectors, TV, Video monitors all crop the image.
Building an anamorphic lens system using an old anamorphic projector lens is describe below. The process is very "do it yourself" that is, its a custom design requiring allot of custom building and fine tuning for each instance of camera.
The lens used here is a Bausch and Lomb Cinemascope Projector Attachment I simply affixed infront of a Panasonic PV-DV51 mini_DV camera. These lenses where used in 35 mm theater projection systems. They are anamorphic lenses with a compression ratio of 1:2 which means they squeeze the image along one axis in half. So, if the lens is upright then everything viewed through it is twice as tall as it would be normally, or if the lens is rotated 90 degrees, from it's upright position, everything viewed through the lens is twice as wide as it would be normally. An anamorphic lens, with a 2:1 compression was placed in front of the camera thereby resulting in a tall skinny image on the flat image format, 1.33:1, film which could be 35 mm, 16 mm, or even 70mm. Upon projection, an anamorphic lens with a compression of 1:2 was placed in front of the projector which would stretch out the image from the film to be twice as wide as it is on the film. The result is a 1:2.35 image format, wider than the 16:9 format. Now jump ahead to the DV cam. Using the letterbox function on the DV cam results in loss of pixels used since the process simply cut off the top and bottom pixels to give the wide look. But this means you are not using the full potential of your cameras ccd's. Using anamorphic lenses to achieve the wide screen look you are using all of your camera's CCDs thereby achieving higher resolution in you finished product. Placing and anamorphic lens in front of the camera squeezes the image so that in post production the image must be stretched out. I use Sonic Foundry's Vegas with much ease to stretch out the images and it looks great. I have also used Adobe's Premiere but its a bit more cumbersome, but the image is still great. Some trouble can come from the interlaced fields of DV, the lens compression can make the image wavy or lined but this has always cleared up for me by either fine tuning the rendering compression. The best image would come from a camera that could record its image in a progressive mode rather than interlaced just like real film. One thing to remember, DV-Cinemascope is a 3:1 aspect ratio. Regular mini-DV has an aspect ratio of 1.5:1 so if you stretch this by 2X with a Cinemascope anamorphic lens you get aspect ratio of 3:1, that is very wide!
The Bausch and Lomb lenses can be acquired on Ebay from $30 to $100. When buying lenses from ebay make sure you see a clear picture of the glass otherwise don't buy!!! The threads of the Bausch and Lomb lens do not fit any standard camera mount. They have a 68.5 mm thread. I went to several machinist to have a reducer built for my mini-DV cam but the cast was over $200 and there was no ability to adjust the tilt, yaw, and rotation of the lens which is crucial for the proper image from the lens. So, I have built a rail system using precut angle iron, which is actual stainless steel, strips of thin stainless steel sheet metal, large hose clamps, and an assortment of nuts, wing nuts and bolts. All of these materials were purchased at my local hardware store and assemble using no more than pliers, tin-snips, and a screwdriver.
Other anamorphic lenses can be acquired that have standard threads, from companies like Bell and Howell, Sankor, and others. These lenses may also be much smaller unlike the lens I use which is seven inches (7")long and about eight pounds (8lb). Some of these lenses are designed especially for cameras but I have found that projections lenses work just as well for cameras.
A simple DIY lens rail system will facilitate mounting the anamorphic adapter to a camera. A simple lens rail system can be built from an aluminum tube (purchased from Home Depot for aprox $3.00) one 24" length of 1/2" X 1" oak (cut in to several short pieces) and a hand full of 1/4" bolts. The the oak blocks need to be cut to size and have holes drilled in them to received the tube. A drill press is recommended as a hand drill does not cut an adequate hole. The pipe needs to fit slightly loose so set screws (1/4" bolts) can be used to fix the pipe and the blocks securely in a desired position.
Professional anamorphic lens systems are most commonly made for 35mm motion picture cameras. However, custom made anamorphic system can be made for 16 mm, standard definition video (analogue and mini-DV) High Definition video cameras, and even 8 mm and super 8 mm film camera can be fitted with anamorphic lens adapters.
Examples of films shot with DIY anamorphic setups:
To view an actual movie using this mini-DV scope method download owyheesound's
The Bicycle of Nathan
(pre visualization, a test film to see if a moving camera support system would work, as you will see it did not work well so the film was not made)
" The Uprise" (note the image is tilted to the right due to improper alignment of the anamorphic adapter)
You can also download FTB's anamorphic film
" Thai Chicken "
And be sure to check out owyheesound's most ridiculous film shot in anamorphic super 8 mm format "Gorilla Snomobilly."
Projecting anamorphic films:
If you create and edit your super 8 mm anamorphic project the old fashioned way, and project right from the film, then you have the opportunity to demonstrate the "real" WIDE SCREEN experience. After you have edited the film you shot with your camera, using the anamorphic lens, and your film is ready for projection, simply mount the anamorphic lens in front of the projector. The lens should be oriented the same way it is as when it is on the camera. The lens will stretch the projected image twice as wide as normal projection. You will need a screen that is twice as wide or you will need to move you projector to half of the distance away from the screen, or some combination of the two.
Stretching an anamorphic image on a nonlinear digital editing system is fun and it does yield the wide screen, though it is not as impressive as projecting an anamorphic image from the actual film. If you have the means, this is a great super 8 mm project.
Here is an extra bonus for those of you who got through the above....
Vertical anamorphic is simply using an anamorphic lens in the 90° (90 degrees) to the normal horizontal anamorphic magnification direction. Where a regular horizontal anamorphic design provides wide landscapes the horizontal anamorphic (Tall Screen) is suitable to tall buildings in
cityscapes and standing portraiture.

 Cinemascope is the name of the anamorphic process that 20th Century Fox used to create the widely distributed widescreen movies in the 1950s. Cinemascope is also a brand of anamorphic lens. There are other well know brands like Panavision, and Todd AO. However, all of these lenses are the same in that they are anamorphic lenses. An anamorphic lens compresses an image going into a camera 2x along one axis only. For widescreen movies they are set up to compress the horizontal axis.
  Not all anamorphic lenses are 2X. Another popular format is the 1.5X anamorphic lens. When this lens is used in conjunction with a medium that has a native format of 1.33:1 the final stretched image is very close to the 2:1 format. And if a 1.33X anamorphic lens is used with the 1.33 format the resulting stretched image will be very close to the popular 16:9. To the right a 1.5X anamorphic adaptor is pictured. This particular adaptor was commonly used on bolex 16mm cameras.
 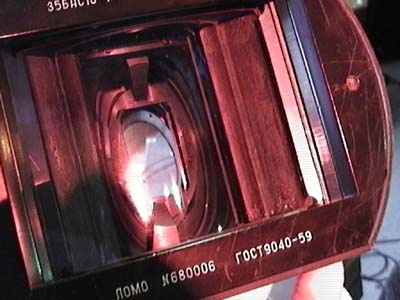 the ability to use selectable focus. Selectable focus is a photography too that is closely associated with the "real" film look and can be a great tool for transitions, and focusing the audiences attention. But when trying to focus a simple anamorphic lens the camera's iris will need to be closed down substantially to focus both the horizontal and the vertical image planes. This will create a large or even infinite focus field depth but that's the price for affordable wide screen. Check out the old Cinemascope prints from the 50s and 60s, everything is in focus, because of a very wide fields of focus depth.
 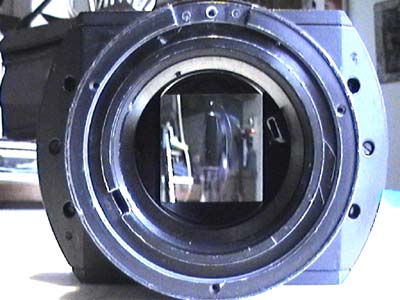 a virtual widening of a factor of two. This creates an effect that is very soft, but not out of focus, and has a "filmick" quality all its own. So what you loose in a narrow depth of field you make up for using an anamorphic lens.
 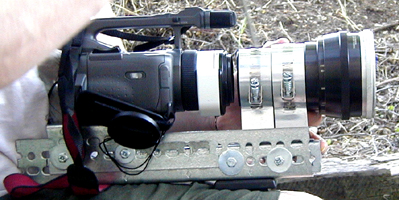 your image (the actual height and width of the captured image). But this is only a problem if your final presentation is going to be on the computer which is generally the only medium that shows the whole image. Projectors, TV, Video monitors all crop the image.
 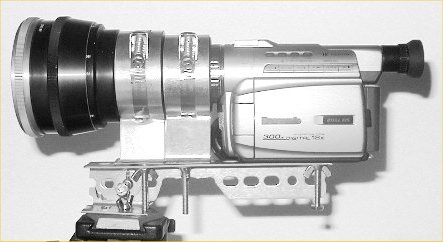 The lens used here is a Bausch and Lomb Cinemascope Projector Attachment I simply affixed infront of a Panasonic PV-DV51 mini_DV camera. These lenses where used in 35 mm theater projection systems. They are anamorphic lenses with a compression ratio of 1:2 which means they squeeze the image along one axis in half. So, if the lens is upright then everything viewed through it is twice as tall as it would be normally, or if the lens is rotated 90 degrees, from it's upright position, everything viewed through the lens is twice as wide as it would be normally. An anamorphic lens, with a 2:1 compression was placed in front of the camera thereby resulting in a tall skinny image on the flat image format, 1.33:1, film which could be 35 mm, 16 mm, or even 70mm. Upon projection, an anamorphic lens with a compression of 1:2 was placed in front of the projector which would stretch out the image from the film to be twice as wide as it is on the film. The result is a 1:2.35 image format, wider than the 16:9 format. Now jump ahead to the DV cam. Using the letterbox function on the DV cam results in loss of pixels used since the process simply cut off the top and bottom pixels to give the wide look. But this means you are not using the full potential of your cameras ccd's. Using anamorphic lenses to achieve the wide screen look you are using all of your camera's CCDs thereby achieving higher resolution in you finished product. Placing and anamorphic lens in front of the camera squeezes the image so that in post production the image must be stretched out. I use Sonic Foundry's Vegas with much ease to stretch out the images and it looks great. I have also used Adobe's Premiere but its a bit more cumbersome, but the image is still great. Some trouble can come from the interlaced fields of DV, the lens compression can make the image wavy or lined but this has always cleared up for me by either fine tuning the rendering compression. The best image would come from a camera that could record its image in a progressive mode rather than interlaced just like real film. One thing to remember, DV-Cinemascope is a 3:1 aspect ratio. Regular mini-DV has an aspect ratio of 1.5:1 so if you stretch this by 2X with a Cinemascope anamorphic lens you get aspect ratio of 3:1, that is very wide!
 cquired on Ebay from $30 to $100. When buying lenses from ebay make sure you see a clear picture of the glass otherwise don't buy!!! The threads of the Bausch and Lomb lens do not fit any standard camera mount. They have a 68.5 mm thread. I went to several machinist to have a reducer built for my mini-DV cam but the cast was over $200 and there was no ability to adjust the tilt, yaw, and rotation of the lens which is crucial for the proper image from the lens. So, I have built a rail system using precut angle iron, which is actual stainless steel, strips of thin stainless steel sheet metal, large hose clamps, and an assortment of nuts, wing nuts and bolts. All of these materials were purchased at my local hardware store and assemble using no more than pliers, tin-snips, and a screwdriver.
 lens rail system can be built from an aluminum tube (purchased from Home Depot for aprox $3.00) one 24" length of 1/2" X 1" oak (cut in to several short pieces) and a hand full of 1/4" bolts. The the oak blocks need to be cut to size and have holes drilled in them to received the tube. A drill press is recommended as a hand drill does not cut an adequate hole. The pipe needs to fit slightly loose so set screws (1/4" bolts) can be used to fix the pipe and the blocks securely in a desired position.
  systems are most commonly made for 35mm motion picture cameras. However, custom made anamorphic system can be made for 16 mm, standard definition video (analogue and mini-DV) High Definition video cameras, and even 8 mm and super 8 mm film camera can be fitted with anamorphic lens adapters.
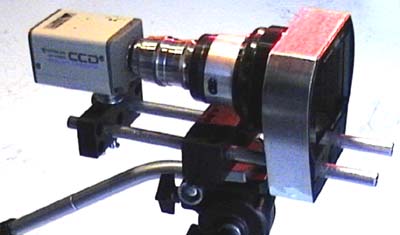 edited the film you shot with your camera, using the anamorphic lens, and your film is ready for projection, simply mount the anamorphic lens in front of the projector. The lens should be oriented the same way it is as when it is on the camera. The lens will stretch the projected image twice as wide as normal projection. You will need a screen that is twice as wide or you will need to move you projector to half of the distance away from the screen, or some combination of the two.
  Stretching an anamorphic image on a nonlinear digital editing system is fun and it does yield the wide screen, though it is not as impressive as projecting an anamorphic image from the actual film. If you have the means, this is a great super 8 mm project.